Introduction
This writeup deals with the The bin in the dump challenge from EchoCTF. This challenge focused on forensic examination of a filesystem image. A compressed gunzip archive the_bin_in_the.dump.gz contains the filesystem image to be examined.
Challenge Statement:
This forensics exercise is about demonstrating some basic tasks that are required in order to trace an attack on a compromised system.

The actual data are illustrative and no actual trojans or exploits exist in any of the files

You are given a filesystem dump and you are tasked to find and report the following details...
Writeup
First things first. Before jumping into the questions we need to understand what kind of file system we are dealing with.

So the output of file command tells us this is a linux-based EXT3 file system. Now we can try to list some contents of the file system using fls from The Slueth Kit.

It looks like we got a root file system at our hands.
Now the questions. The questions are not answered in order as a single output command can give more than one.
Q3. What is the UUID of the filesystem? (100 pts)
Analyze the file and provide the UUID of the filesystem as an answer
As from the file command, we already know the UUID. So that’s one.
Q1. What is the filesystem LABEL? (100 pts)
Analyze the file and provide the filesystem LABEL as an answer

Q2. What is the last folder this file system was mounted under? (100 pts)
Analyze the file and find what was the last folder this file system was mounted under. Provide the folder name verbatim as an answer.

Q4. When was the filesystem created? (100 pts)
Analyze the filesystem and report what was its creation date and time in UTC. The date format is: YYYY-MM-DD HH:MM:SS

Q5. When was the filesystem last write time? (100 pts)
Analyze the filesystem and report what was the last write date and time in UTC. The date format is: YYYY-MM-DD HH:MM:SS.
Now, all this information can be obtained in a number of ways. Here we use debugfs. Using the tool with the -R option allows us to execute a single “request” command. Otherwise the tool is interactive. It’s quite the loaded tool for debugging and examining EXT2/3/4 file systems.
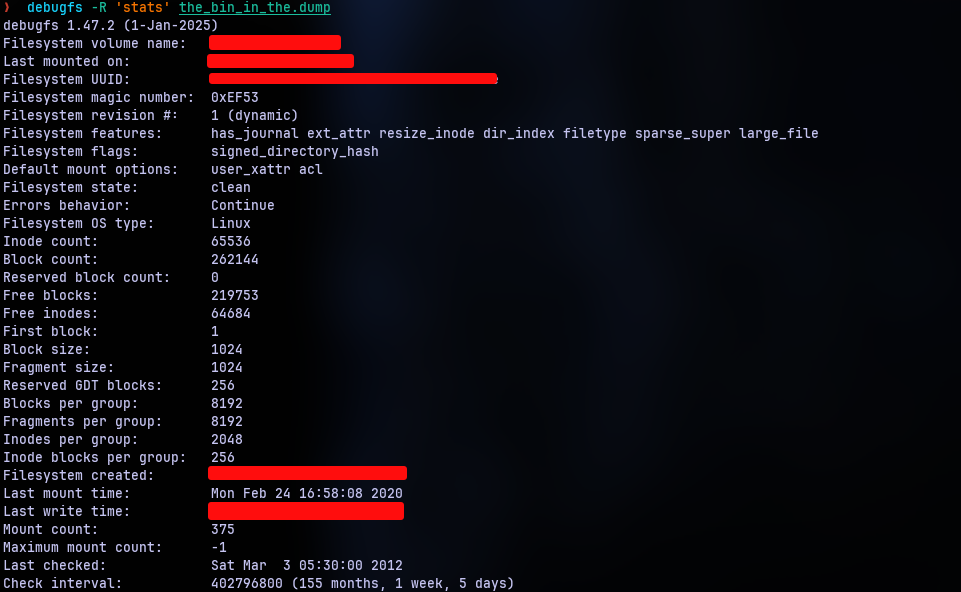
Now we have a lot of information on the screen. We have our filesystem label as the volume name, Last mounted on folder name, file system creation date, last write date among them. Note that there is a matter of localization in the dates. The question specifies we need it in UTC, but I’m on IST, so I had to convert the time.
Q6. What is the file modified by the attacker? (150 pts)
Analyze the filesystem and report what was the full path of the filename that was modified by the attacker?
Now it’s time to get a little creative. Assuming that the file system dump was created after the supposed “attack”, the file modified by attacker needs to have the most recent last modified date. Now I’m not familiar with ways to directly find out the most recently modified file directly.
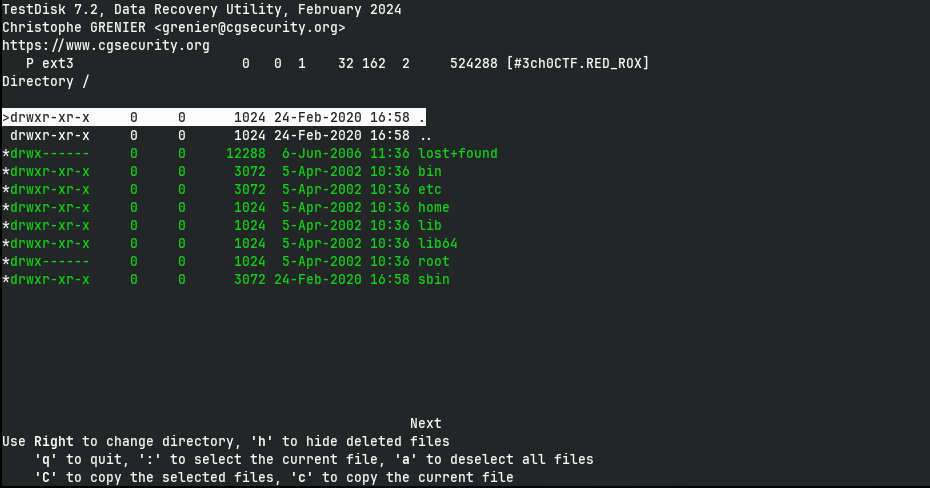
So I dumped all the files in to my local file system using a tool called testdisk (about the tool). This can also be used to recover recently deleted files.
The tool has a ncurses-like interface with nice hints. So it is pretty self-explanatory. One can also use tsk_recover tool from TSK for the same purpose as well. But the problem is tsk_recover does not preserve the modification date from the original file.
Now you can use the basic ls command in long list mode to find the most recently modified one manually. But we can use find tool with some pipeline magic to do that for us. The following is the command I ended up going with:
find output -type f -exec stat --format '%Y |%y %n ' '{}' \; | sort -nr | awk -F'|'' '{print $2}' | head -10
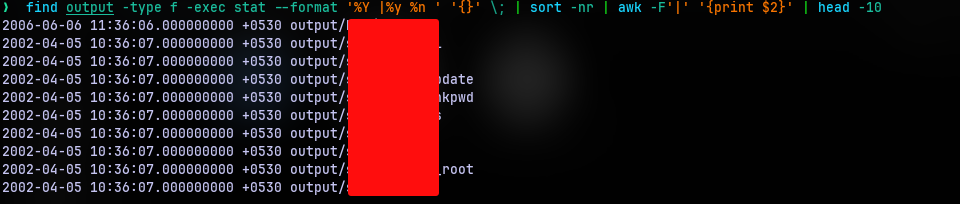
On top of the list we have our answer which seems to have modified in 2006. The others are from 2002. So that’s our answer.
Q7. What is the full path of the ETSCTF binary that got deleted? (250 pts)
Analyze the filesystem and report what was the full path of the ETSCTF file (the file may have extension)?
Now any file we delete is not actually wiped from the disk by default. Their inodes are declared as free and will be overwritten eventually. But until that happens the data is still present in the same location. Most data recovery programs use this.
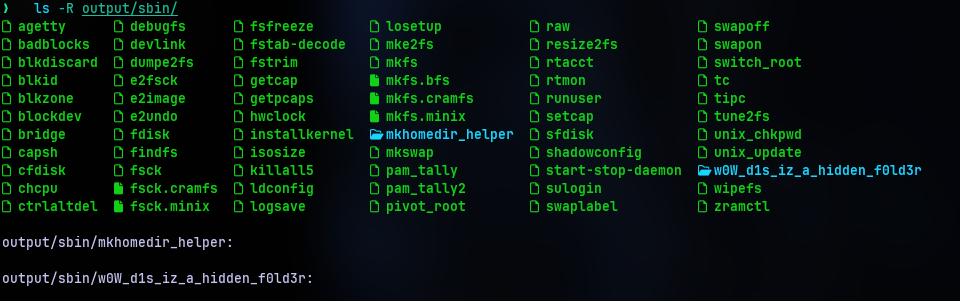
Parsing through all the inodes can be a tedious task. Lucky for us, TSK provides a tool fls that is used to list all the files in a file system image. One can make it to return only deleted entries with the -d option.
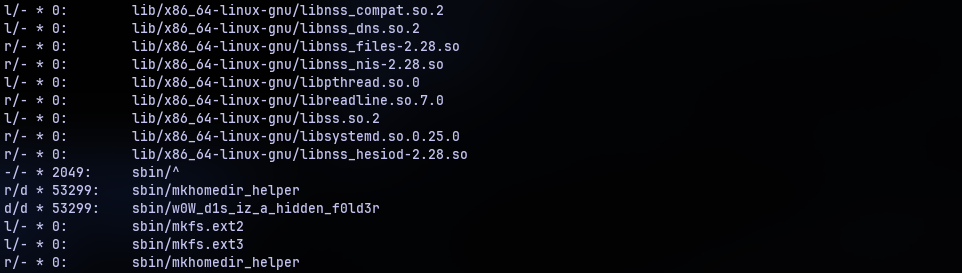
Above is a snippet of the output. Note that we have a few entries with a non-zero number and others with a 0. As far as I know we can only recover the non-zero entries. The numbers are nothing but the inode numbers of that particular file or directory. So I think a zero means overwritten inode.
Among the entries we have a peculiar directory w0W_d1s_iz_a_hidden_f0ld3r. Yes it is a directory. Notice the ’l’s, ‘r’s and ’d’s? That’s what kind of data was stored in that inode. ’d’ means directory.
But the question is for a file. So maybe it is in the directory? But if it was in the directory and if it was recoverable it should be in the dumped files right?
Nope. Not there. It’s an empty directory. But let’s not give up just yet. There is tool called extundelete(about the tool) that is specific for recovering data from EXT partitions. Using the --restore-all option we can see 2 inodes are recovered.

Listing the files recovered, we have:

So there is our deleted file and the answer.
 Q8: What is the flag that would have been displayed by the ETSCTF binary? (300 pts)
Analyze the filesystem and restore the deleted ETSCTF file. If you only change the first 2 bytes you may be able to run this... If you run this you will be able to get a flag. Give it as an answer here verbatim
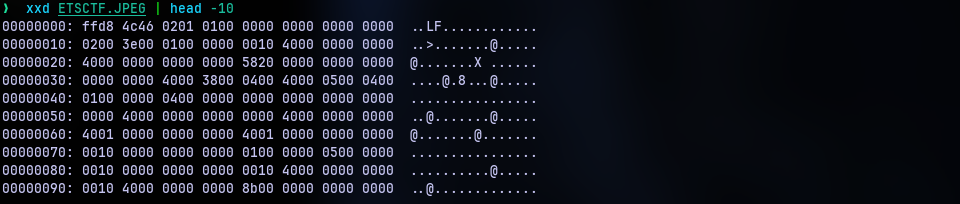
By looking at the hex dump, we can say it is not a JPEG. But it doesn’t have any other known file signature as well. But the question says we have to modify the first 2 bytes. So what should we change to? The third and fourth bytes are ‘L’ and ‘F’ respectively. So it is safe to assume that this may be an ELF binary.
Open the binary in a hex editor of choice and change the first two bytes to “7F 45” as the file signature for ELF is “7F 45 4C 46” according to wikipedia.
Do that and slap on the executable bit on the binary with chmod +x, we can execute it. Executing it yields:

Conclusion
And that brings the challenge to an end. I wouldn’t say it as easy as the challenge description puts it. But if you’re strong with the fundamentals and know how to search for tools to do things, it is doable.